This chapter describes how to install software on the SGI management node (SMN) and the Altix UV system itself in case of root disk failure on either platform. It covers these topics:
Figure 1-1 shows one rack of an SGI Altix UV system.

The system management node (SMN) is either located in the top 1U slot between the individaul rack units (IRUs) or at the top of the rack.
To install SLES 11 software images on the system admin controller, perform the following steps:
Turn on, reset, or reboot the SMN. The power on button is on the right of the SMN, as shown in Figure 1-2.
Insert the SLES 11 Service Pack 1 DVD in the DVD drive on the left of the SMN as shown in Figure 1-2.
Once installation of software on the system management node is complete, remove the DVD from the DVD drive.
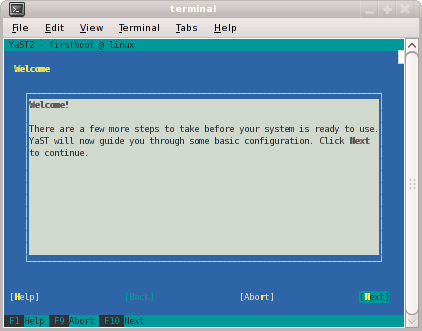
After the reboot completes, you will eventually see the YaST2 - firstboot@Linux Welcome screen, as shown in Figure 1-3. Select the Next button to continue.

Note: The YaST2 Installation Tool has a main menu with sub-menus. You will be redirected back to the main menu, at various times, as you follow the steps in this procedure.
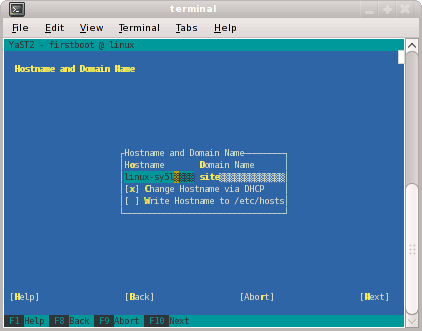
You will be prompted by YaST2 firstboot installer to enter your system details including the root password, network configuration, time zone, and so on.From the Hostname and Domain Name screen, as shown in Figure 1-4, enter the hostname and domain name of your system in the appropriate fields. Make sure that Change Hostname via DHCP is not selected (no x should appear in the box). Note that the hostname is saved to /etc/hosts in step 10, below. Click the Next button to continue.
Note: The mostly used keys are Tab and Shift + Tab to move forward and backward in modules, the arrow keys to move up and down or left and right in lists, the shortcuts (press Alt + highlighted letter) and Enter to execute the selected action or activate a menu item.
You can use Ctrl L to refresh the YaST screen as necessary.
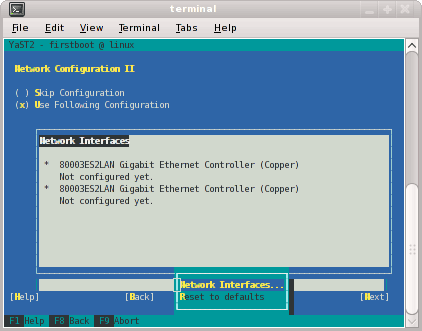
The Network Configuration II screen appears, as shown in Figure 1-5. Select Change and a small window pops up that lets you choose Network Interfaces... or Reset to Defaults. Choose Network Interfaces.
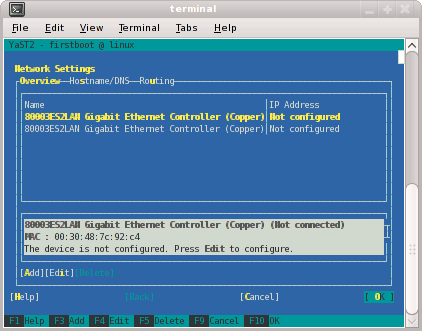
From the Network Settings screen, as shown in Figure 1-6, configure the first card under Name to establish the public network (sometimes called the house network) connection to your SGI Altix UV system. To do this, highlight the first card and select Edit.
Note: In SLES11, this screen is also where we will come back to in order to set up things like the default route and DNS. You can see all of those menu choices just to the right of Overview in Figure 1-6.
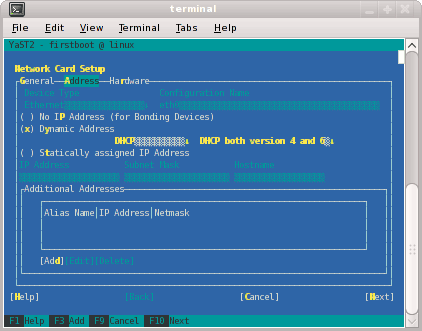
The Network Card Setup screen appears, as shown in Figure 1-7. SGI suggests using static IP addresses and not DHCP for admin nodes. Select Statically assigned IP Address. Once selected, you can enter the IP Address, Subnet Mask, and Hostname.
Note: You must use a fully qualified hostname (host + domain), such as, mysystem-admin.domainname .mycompany.com.
These are the settings for your admin node's house/public network interface. You will enter the default route, if needed, in a different step. Select Next to continue.
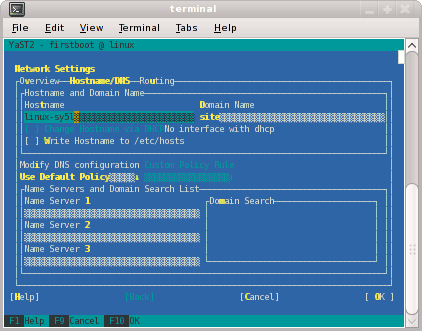
At this point, you are back at the Network Settings screen as shown in Figure 1-8. At this time, select Hostname/DNS. In this screen, you should enter your house/public network hostname and fully qualified domain names. In addition, any name servers for your house/public network should be supplied. Please select (ensure an x is in the box) for Write hostname to /etc/hosts. Do not select OK yet.
Select Routing shown in Figure 1-9 and enter your house/public network default router information there. Now you can select OK.
You are now back at the Network Configuration II screen, Click Next.
In the Clock and Time Zone screen, you can enter the appropriate details. Select Next to continue.
In the Password for the System Administrator "root"' screen, enter the password you wish to use. This password will be used throughout the cluster, not just the admin node. Select Next to continue.
In the User Authentication Method screen, most customers will want to stick with the default (Local). Select Next to continue.
In the New Local User screen, you can just select Next (and say Yes to the Empty User Login warning). Select Next to continue.
In Installation Completed, select Finish.
After you have completed the YaST first boot installation instructions, login into the system admin controller. You can use YaST2 to confirm or correct any configuration settings.
Note: The SGI System Management Node Software 1.0 Release Notes are available on SGI SupportFolio https://support.sgi.com/login.
Using YaST2, from the SGI-System-Management-Node-Software-1.0 ISO, install the following:rpm -i noarch/sgi-smn-release-1.0-sgi701r3.sles11.noarch.rpm rpm -i x86_64/monit-5.0.3-1sgi701r1.sles11.x86_64.rpm rpm -i x86_64/monit-sgi-rules-5.0.3-1sgi701r1.sles11.x86_64.rpm rpm -i x86_64/sysco-uv-libs-1.0-20100520.1219sgi701r1.sles11.x86_64.rpm rpm -i x86_64/sgi-gather-smn-uv-1.0-sgi701r1.sles11.x86_64.rpm rpm -i x86_64/sysco-uv-1.0-20100520.1219sgi701r1.sles11.x86_64.rpm


This section describes how to do a clean install on a SGI Altix UV server.
Currently, to reinstall your software you need a USB-DVD and connect that to the BASEIO (see Figure 1-1) and boot the Novell rescue CD.
Use a USB-DVD drived to connect to the BASEIO and boot using the Novell rescue CD. You need to get BIOS booted to efi shell and boot from the DVD. Use a command similar to the following:
fs1:efi\boot\bootx64 -i initrd linux console=ttyS0,115200n8 ssh=1 |
| Note: The fs number may be different. Booting an Altix UV systems takes some time. It may take awhile for the screen to change. |
When partitioning the system disk, you need to create a /boot/efi partition instead of a /boot partition.
For information on installing software on your Altix UV sever, see “Installing SLES 11 SP1, SGI Foundation 2 SP1, and SGI ProPack 7 SP1 Software”.
For information on how to install SGI Management Center (SMC) software, see the SGI Managment Center Installation and Configuration guide available at http://docs.sgi.com. In particular, see Chapter 1, “Installing SGI Management Center” and “Install Management Center Payload” section in Chapter 4, “Creating Payloads and Images”.
A quick overview of installation and initial configuration is, as follows:
Add an entry to the /etc/hosts file. The entry for "host" must be there, as follows:
172.21.0.1 admin.default.domain admin host loghost
Install the following packages:
pyxml (SLES 11 SP1 Media)
apache-log4cxx (from the SGI MC -- AP ISO)
Prerequisites: (SGI MC Media)
db46-4.6.21-0.1sgi701r1.sles11.x86_64.rpm
ice-3.3.0-sgi701r1.sles11.x86_64.rpm
ice-java-3.3.0-sgi701r1.sles11.x86_64.rpm
ice-libs-3.3.0-sgi701r1.sles11.x86_64.rpm
java-1.6.0-sun-1.6.0.17-sgi701r1.sles11.x86_64.rpm
java-1.6.0-sun-fonts-1.6.0.17-sgi701r1.sles11.x86_64.rpm
libdb_java-4_6-4.6.21-0.1sgi701r1.sles11.x86_64.rpm
mkelfImage-2.7-0.1sgi701r1.sles11.x86_64.rpm
Main packages (SGI MC Media)
sgimc-1.1.0-sgi701r1.sles11.x86_64.rpm
sgimc-server-1.1.0-sgi701r1.sles11.x86_64.rpm
shout-0.1-sgi701r1.sles11.x86_64.rpm
TFTP packages:
tftp (SLES 11 SP1 Media)
sgimc-tftp
sgimc-tftpboot
or
atftp (SLES 11 SP1 Media)
sgimc-atftp
sgimc-tftpboot
Note: If in doubt, just use tftp
Start shout, as follows:
# /etc/init.d/shout start
# chkconfig shout on
Request a SGI Altix UV enabled LK license for SGI MC from SGI. Put the contents in /etc/lk/keys.dat.
Restart the sgimc daemon, as follows:
# /etc/init.d/mgr restart
Make sure the following daemons are enabled to run at boot time:
dhcpd
ntp
tftp or atftp
Start the following services:ntp tftp or atftp
Open the SGI MC GUI and make the following configuration changes:
Go to Edit -> preferences. In General network preferences change the subnet to 172.21.0.0 netmask 255.255.0.0
Still in General network preferences, make sure the log server and ntp server are that of the Management Network for the SMN (usually 172.21.0.1).
Set the NTP server to 127.0.0.1
Put a check mark in Direct PXE Boot and keep EFI Boot checked as well.
This section describes how to create a new payload called "SSI-payload", as follows:
Create a payload directory, as follows:
# mkdir -p /opt/sgi/sgimc/imaging/root/payloads/new-payload
Create a payload.profile, as follows:
# cd /opt/sgi/sgimc/imaging/root/payloads/new-payload
and then edit the payload.profile to look similar to the following:#SGI Management Center Payload #Tue May 25 17:34:17 CDT 2010
architecture=x86_64 name=new-payload description=New payload for an SSI
In the Management Center GUI, refresh the Imaging pane. Open the payload and check it in.
The following set of instructions is based on an install using the physical product media. For other installation methods, see the product release notes.
For an overview of SLES11 SP1 installation, see the SUSE Linux Enterprise Server 11 Installation Quick Start (installquick.pdf). This document provides a quick overview of how to run through the default installation of SLES walking you through a number of installation screens. For detailed installation instructions, see the SUSE Linux Enterprise Server 11 Deployment Guide (deployment.pdf)
| Note: Documentation for SUSE Linux Enterprise Server 11 SP1 is located on your system in the /docu/en directory. |
| Note: If you are only installing SLES11 SP1 and SGI Foundation 2 SP1 software, just skip the steps about installing SGI ProPack 7 SP1. |
To install SUSE Linux Enterprise Server 11 (SLES11) SP 1 from the DVD media and SGI Foundation Sotftware 2 SP1 and SGI ProPack 7 SP1 as an add-on products, perform the following steps:
Insert the SLES 11 SP1 Installation DVD in the DVD drive and reboot your system.
Follow the steps in the SUSE Linux Enterprise Server 11 Installation Quick Start. When you get to the Installation Mode screen, as shown in Figure 1-10, click the button next to Include Add-On Products from Separate Media and then click Next to continue.
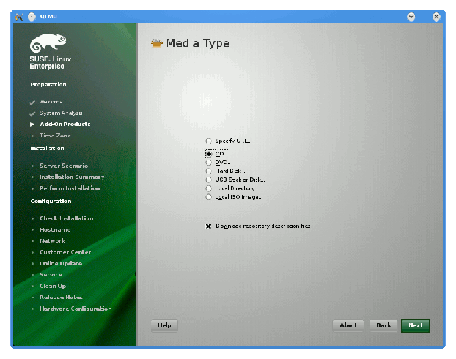
From the Media Type screen, shown in Figure 1-11, click the button to the left of CD.
The Insert the add-on product CD dialog box appears. Insert the SGI -Foundation-x86_64 CD into the drive and click the Continue button and then Next to proceed.
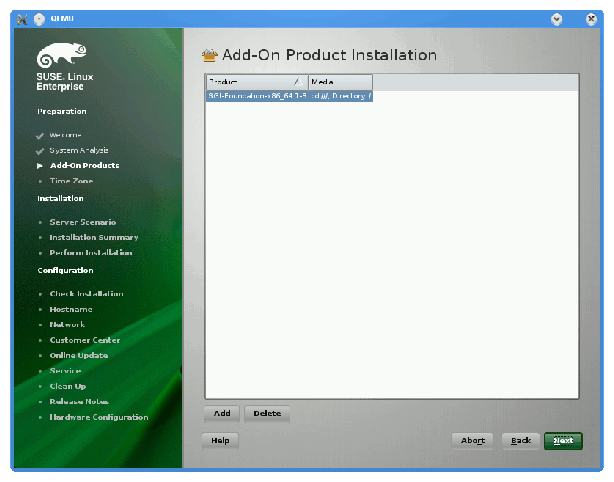
From the Add-On Product Installation screen, as shown in Figure 1-12, click on SGI-Foundation-x86_64 1-6 cd:///.Directory and click the Add button and then Next to proceed
Repeat steps 3 through 6 to add SGI ProPack 7 SP1 for Linux as an add-on product. Eject the SGI Foundation 2 SP1 CD and replace it with the SGI ProPack 7 for Linux Service Pack 1 CD. From the Add-On Product Installation screen as shown in Figure 1-12, click on SGI-ProPack-x86_64 6-4 cd:///Directory click the Add button and then Next to proceed.
Follow the SLES11 SP1 instructions to complete the installation.