This chapter provides the following sections to help you rackmount your system IRU:
Read all the introductory matter before beginning the installation.
The rackmount rail hardware in this kit enables you to mount the Altix UV 100 IRU systems in many standard 19-inch equipment racks. Note that installation in such racks may require submittal to an approved safety agency for evaluation, certification, or licensing of the new rack-system combination. The primary emphasis of the instructions in this chapter is on mounting in an approved SGI rack.
When used with the mounting rails provided, each IRU chassis uses 3 U of vertical rack space, which is 5.25 inches or 13.3 cm. (One “U” is equal to 1.75 inches or 4.445 cm.).
| Caution: The Altix UV 100 IRU weighs up to 93 lbs. (42.3 kg). To protect personnel and equipment, always use two or more installers when rackmounting an IRU. Always install the Altix UV 100 IRU in the lowest available position within the rack. |
This section provides steps and illustrations necessary to install the outer rack rails to the rack:
| Note: The chassis (Altix UV 100 IRU) comes with the “inner” rails already connected to the side of each unit, you should not need to attach them. |
Each “outer” rack rail uses four M5 T25 Torx-head screws to attach a rail to an SGI rack. For third-party square-hole racks, the mounting kit supplies eight conical washers and eight M5 #2 Phillips flat-head screws. Use the following steps and illustrations to install the outer rails.
Choose the lowest available 3U space within the rack. If there are other Altix UV 100 IRUs already mounted in the rack, leave two vertical rack-rail screw holes between the top rail of the already installed unit and the bottom of the new rail.
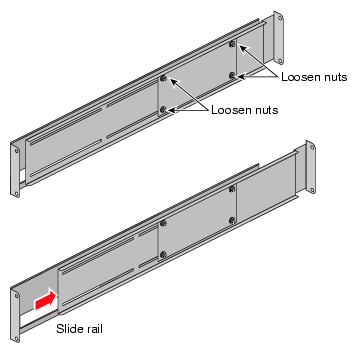
Each outer rail has a “nut plate” that acts as a depth adjuster. You can adjust the length of a rail by loosening the nut plate with the T25 Torx driver and sliding the rail. See Figure 7-1 for an example. Note that the rack mounting rails require a minimum interior mounting depth of 28.5 inches (72.4 cm).
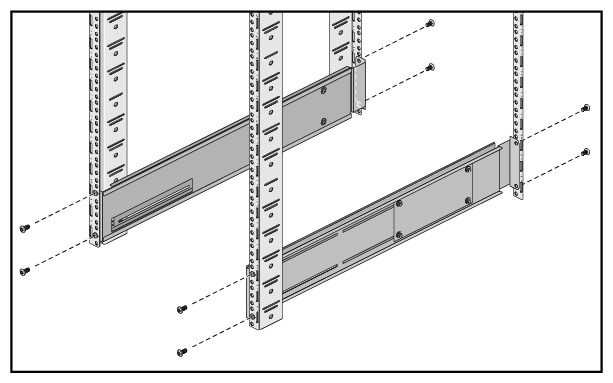
Install the right-side and left-side outer rails inside the front and rear vertical rails and secure with four Torx-head screws per rail. Use the flat-head screws and conical washers if installation is in a third-party rack with square holes.
Confirm that both rails are evenly aligned vertically within the rack before tightening all the screws. See Figure 7-2 for an example.
Go on to the next section for information on installing the IRU onto the slide rails.
Install the IRU into the rack using the following steps and illustrations:
Using at least two people, lift the IRU so that the rear of each inner slide rail (attached to the IRU) aligns with the front of the rack mounting rails.

Tip: Reduce the IRU's weight by extracting the unit's power supplies prior to installation. Once the IRU's inner rails have properly engaged the outer rails on both sides of the rack; slide the unit inward. You should hear a “click” as the slide-rail latches engage. See Figure 7-3 for the location of the slide-rail latches.
Push the IRU fully into the rack.

Note: Once the IRU is properly mounted on the rails you must depress both slide-rail latches to pull it fully out of the rack.

Use the following information to secure the installed Altix UV 100 IRU in the rack:
| Caution: The IRU should always be secured in the rack any time the rack will be moved or shipped to another location. Failure to properly secure the IRU could cause damage to equipment. |
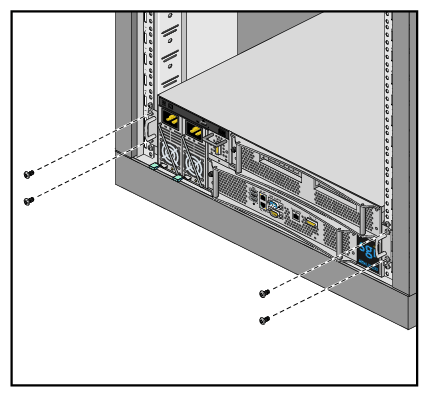
Secure the IRU within the rack by screwing in the four T25 screws that hold the unit's “ears” to the rack's front vertical rails. See Figure 7-4 for an example.
Repeat the steps in the previous subsections to install additional IRUs.